A Walk through Sapling’s IP Clock Monitor Software and Web Interface
Enjoying the luxury of IP clocks in your establishment? Then you must also enjoy the new found power and control you now have over your clock system. With Sapling’s IP clocks installed, users get the value-added option of Sapling’s IP Monitor Software and Web Interface as well. Using these resources is an easy task thanks to Sapling’s innovative knowhow. We’ve made configuring individual IP clocks a cinch with our advanced technology. Let us walk you through our software to show you exactly what we mean.
Sapling’s IP Monitor Software
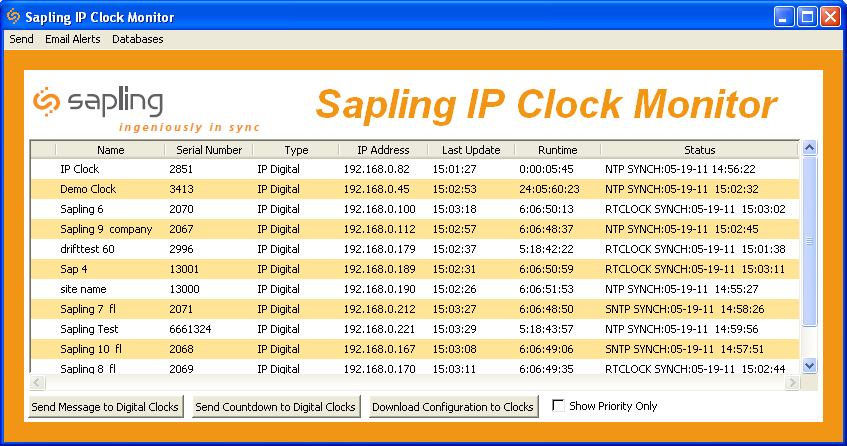
Once your IP clocks are set up, Sapling’s IP Monitor Software only needs to be installed once on one computer to begin reaping the benefits of complete control over your system. Once installed, the program can be opened up to view every IP clock that is connected to the Power over Ethernet (PoE) infrastructure in your facility. Every clock is listed by name, IP address, run time, status and more to make the configuration of each clock a piece of cake. This is the beauty of the IP system. With Sapling’s IP Monitor Software you can view and reprogram every IP clock installed in you facility with just a few clicks of the mouse.
Sapling’s Web Interface
Once you have doubled clicked on an IP clock you’d like to configure from the monitor software, the clock’s individual web interface pops up in your browser. Just enter your password and you’re on your way by clicking through the following individual tabs at the top.
Home: Once logged in, you are presented with the clock’s home page welcoming and informing you of the current time and date information.
Display Settings: In this tab the user can choose between display options such as 12 or 24 hr formats, brightness of display, and whether you want alternating date and time for a digital clock.
Clock Settings: This tab allows you to change your password, clock name, and other basic settings such as time zone offset and bias seconds.
Network Settings: In this section you can view/change the clock’s IP settings such as Gateway IP Address, DNS Router, Mac Address and other PoE IP Clock settings.
Network Servers: Under Network Servers a user can program up to 10 different NTP server addresses to provide a time reference for your clock.
Clock Status: Check here for specific status information regarding your IP clock including NTP server failures, adjustments, last sync and more.
DST: In this area Daylight Saving changes can be set up to occur automatically or manually in the event of a change in the usual time of DST occurrence.
Email Alerts: When configuring this section of the clock, the user can specify the email recipient of status notifications regarding timeouts and countdown/up information.
Log: View logged information regarding your IP clock’s activity here.
Log Out: Click here to log out of the IP Clock Web Interface and prevent further changes from being made without permission.
Voilà! That’s it. To move on to another clock, simply switch back to or reopen the IP Monitor Software and select another subsequent IP clock to configure. It’s that effortless. Want every clock in your system to have the same settings as the first clock you’ve configured? Just right click on the clock with your preferred settings and save the configuration to your computer. After that, you can upload that configuration to as many clocks in the system that you like. Thanks to Sapling, you’re on your way to complete control and automation of your clock system without the hassles of moving from clock to clock for configuration of their individual settings.

